Call us at (650) 856-8833 or email us at Sales@StcValve.com.
Warning: Risk of shock when valve is in operation. Do not touch the prongs while the valve
and timer are operating.
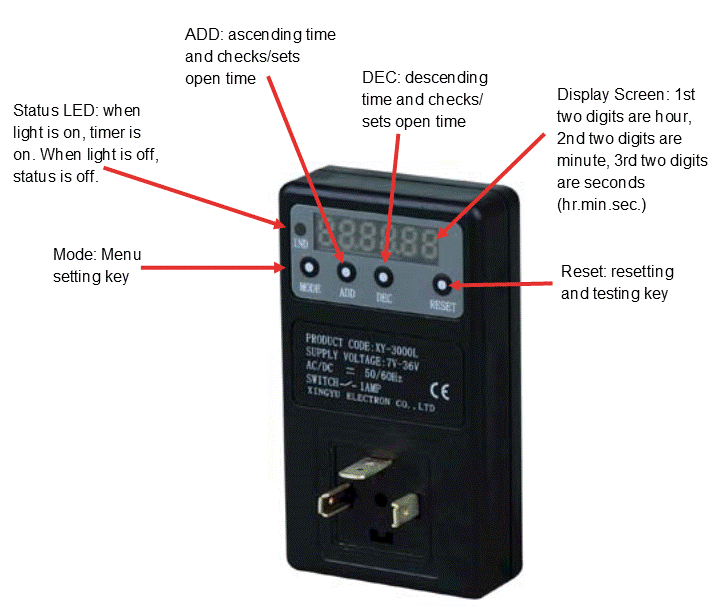
|
Display Operation Modes
- When display screen says "00000," timer is in stop mode.
- When display screen says "CLOSE," timer is in close time setting mode.
- When display screen says "OPEN," timer is in open time setting mode.
- When display screen says "OFF-ON," timer is in closed and opened (cycle) mode.
- When display screen says "ON-OFF," timer is in opened and closed (cycle) mode.
- When display screen says "OFF," timer is closed first and turns to normal open (single) mode after scheduled time.
- When display screen says "ON," it is opened first and turns to normal close (single) mode after scheduled time.
|
Function Declaration
- Covering is made with good quality engineered plastic which is flame retardant, has high security, and is intensity resistant.
- Microcomputer chip control, powerful functions, high time precision.
- LED display, good for night viewing.
- Wide adjustable range of time: 1sec ~ 99h 59min 59sec, open time and close time can be adjusted.
- Functional Model:
- Cycle Mode (Two kinds: open and close, or close and open)
- Single Mode (Two kinds: open at scheduled time, or close at scheduled time)
- Power Supply:
- High Voltage Type AC/DC 110~240V (XY-3000H)
- Low Voltage Type AC/DC 7~36V (XY-3000L)
- Protection class can reach up to IP65 when installed correctly.
- Standard DIN43650A input and output connection.
- When indicator light is lit - timer is ON, when indicator light is unlit - timer is OFF.
|
Types:
This timer is available in
two different types according to voltage (please specify your
preference when ordering):
- High voltage (2W200C-T-DH)
- Low voltage (2W200C-T-DL)
|
Procedures:
To set closed and open time setting mode:
Note: In new applications, display screen will say “OFF.” When power is on, display screen will show “00.01.00” (One minute count down cycle mode).
- Press MODE key until “CLOSE” appears.
- Press MODE key again and screen will say “000000” and you may begin to set close time by pressing the ADD key and DEC key to set hour, minute and second.
- When figures flash, press ADD key to increase time and press DEC key to decrease time.
- Press ADD and DEC keys simultaneously to change between second, minute and hour.
- After setting the close time press MODE key to confirm.
- Press MODE key until “OPEN” appears, then set the open time as in steps 2 to 5.
To set "OFF-ON" and "ON-OFF" mode:
- After setting closed and open time setting mode, press MODE key to enter "OFF-ON" closed and opened mode.
- To switch to “ON-OFF” or back to “OFF-ON” mode, press ADD or DEC key.
- After choosing “ON-OFF” or “OFF-ON” mode, press MODE key to start work.
To set modification time during operation:
Note: The new set time will take effect in next cycle.
- During operation, hold ADD key for 3+ seconds to modify setting of open time (press MODE key to confirm after setting)
- During operation, hold DEC key for 3+ seconds to modify setting of close time (press MODE key to confirm after setting)
To check open or close time:
- During operation, press ADD key to check open time (will return to workspace after three seconds)
- During operation, press DEC key to check close time (will return to workspace after three seconds)
Functions Settings:
- Testing: During operation, press RESET key to test functions
- Stop: During operation, press MODE key to stop work and press RESET key to begin again
- Saved data in case of power failure: In operation, CPU will auto-save data if device is powered off suddenly, and will continue work from saved point after power restoration.
|


